步骤1 选择" > 媒体管理 > 节目"。
步骤2 单击"新建"。
步骤3 设置节目名称和所属类别,单击"下一步"。
步骤4 选择布局模板,单击"确定"。系统显示布局模板属性中的"节目设置"页签及"周"时间表。以节目只有一个布局区域为例,则界面如图5-3所示,界面说明如表5-4所示。如果节目包含多个布局区域,需分别对每个区域进行排期。
图5-3 "节目设置"页签
表5-4 "节目设置"页签说明
...
区域编号
...
区域功能
...
说明
...
1
...
排期按钮区域
...
- 新建:单击此按钮打开"新建"对话框。
- 编辑:选中时间表中的一个排期,单击此按钮打开"编辑"对话框。
删除:选中时间表中的一个排期,单击此按钮删除排期。
- 清空:单击此按钮清空排期。
...
日期按钮区域
...
- 日:按日显示时间表。
- 周:按周显示时间表。
- 月:按月显示时间表。
日程:列出排期,以及每个排期包含的媒体。
...
普通按钮区域
...
- 保存:保存配置。
- 复位:还原配置。
保存&关闭:保存配置并关闭属性界面。
...
日期切换按钮区域
...
:以日、周或月为单位切换到之前的日期。
- 今天:切换时间表到当前日。
- 本周:切换时间表到当前周。
本月:切换时间表到当前月。
...
排期区域
...
默认显示"周"时间表。
步骤5 单击"日"、"周"或"月"进入相应的时间表,执行以下任意一种操作,新建排期。
- 单击"新建"。
- 单击时间表选中一个单元格,并单击
步骤6 在"新建"对话框的"播放清单"页签中,选择一个播放清单。
步骤7 选择"播放计划"页签,设置播放时间段和日期,或者播放时间段和周期。
- 当参数"重复"设置为"不重复"时,如果指定的日期为当日及后7天,则节目可以按计划正常播放;如果指定的日期为其他天,则节目不播放。
- 当参数"重复"设置为"每天"、"每周"、"每月"或"每年"时,节目按指定的周期进行重复播放。
步骤8 选择"选项"页签,设置排期在界面中的显示颜色。
步骤9 配置完成后,单击"确定"。排期以图形方式显示在时间表中。
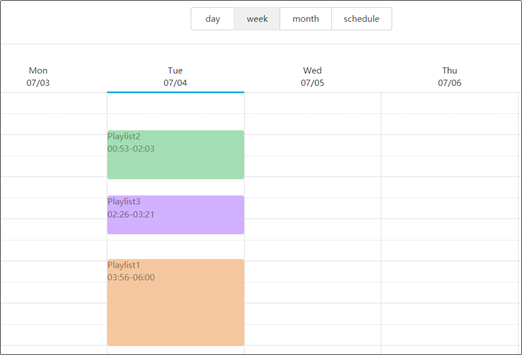
对于"日"和"周"时间表,如果多个排期的时间段有重合,则并排显示在时间列中,图5-4以"周"时间表中的三个排期进行举例。VNNOX支持对这些排期进行以下操作:
- 拖动排期的上下边沿修改时间段。
- 拖动排期到其所属日期的任意位置修改时间段。
- 拖动排期修改其在重合时间段的播放优先级。排期位置从左到右,相应的优先级从高到低。在重合时间段,只有优先级最高的排期才能被播放。例如图5-4中三个清单的播放顺序为:清单3 > 清单2 > 清单3。清单2播放完后,清单3将从头开始播放。清单1不播放。
- 双击排期打开"编辑"对话框。
图5-4 时间段有重合
如果拖动图5-4中的三个排期使时间段无重合,则显示如图5-5所示。
图5-5 时间段无重合
...
Step 1 Choose > Media Management > Solution.
Step 2 Click New.
Step 3 Enter a name for the solution and set its categories, and click Next.
Step 4 Select a frame template and click OK. The Solution Settings tab of the frame template attribute page and the week timetable will appear. An example of a solution with only one frameset is shown in Figure 5-2. Description of the page is shown in Table 5-4. If the solution has more framesets, it is required to schedule each of the framesets respectively.
Figure 5-3 The Solution Settings tab
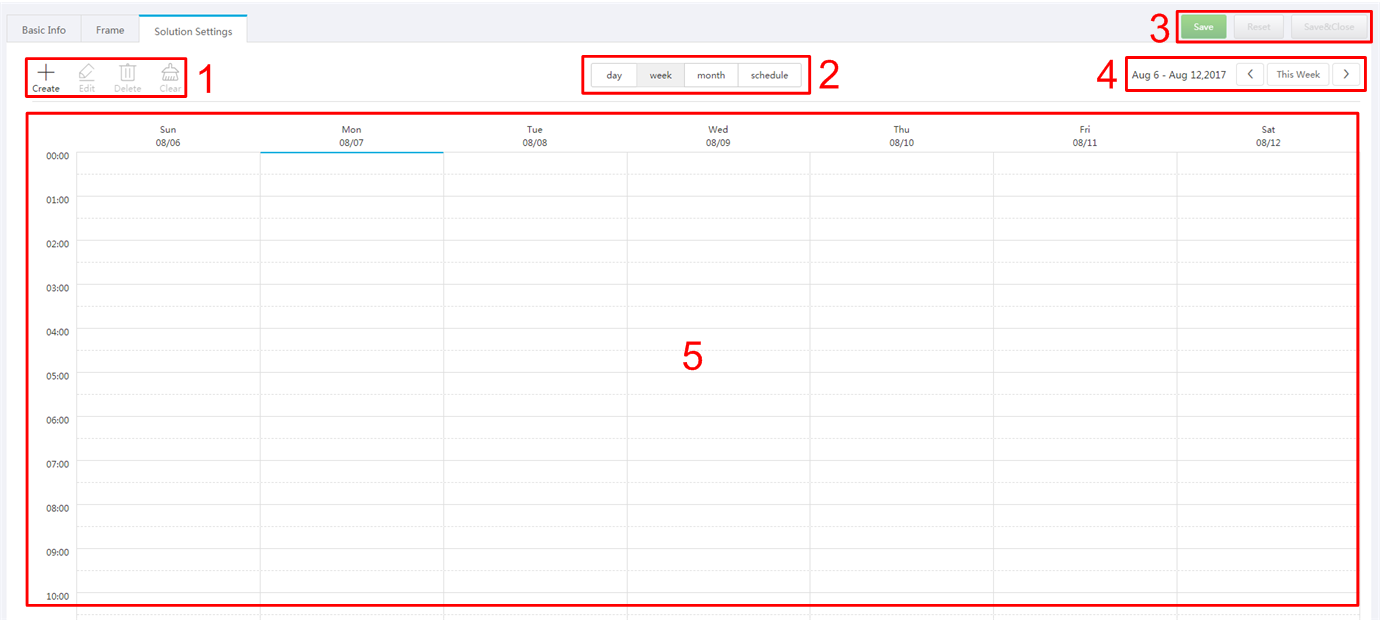
Table 5-4 Description of the Solution Settings tab
No. | Function | Description |
|---|---|---|
1 | Schedule buttons |
|
2 | Date buttons |
|
3 | Common buttons |
|
4 | Date switching buttons |
|
5 | Schedules | The default way to display timetable is by week. |
Step 5 Click day, week or month to enter relevant timetables. Perform any of the following operations to create the solution.
- Click Create.
- Click a cell in the timetable and click
 . Each cell of the timetable in day and week views stands for one hour, while in month view each cell stands for one day.
Step 6 Select a playlist in the Playlist tab of the Create dialog.
Step 7 Select the Play plan tab and set play duration and date or play duration and period.
- When the Repeat is set to Not repeating, the solution can be played normally according to the plan if the date is set to the current day or after 7 days. The solution will not be played if the date is set to other days.
- If the Repeat is set to Every day, Weekly, Per month or Per year, the solution will be played repeatedly according to the period you set.
Step 8 Select the Option tab and set the schedule color displayed in the timetable.
Step 9 After the configuration is completed, click OK. The schedule is graphically displayed in the timetable.
For the timetable in day and week views, the schedules will be displayed side by side in the timetable if the schedules have overlapped timeslot. In Figure 5-4, three schedules in the week timetable are taken as an example. VNNOX supports following operations on the schedules:
- Drag the top and bottom edges of a schedule to modify its timeslot.
- Drag a schedule to any position of the date when the schedule will be played to modify the timeslot.
- Drag the schedules to modify the playback priority order during the overlapped timeslot, for example, the priority order of the three playlists in Figure 5-4 is: Playlist3 > Playlist2 > Playlist3. After the playback of Playlist2 is over, Playlist3 will be played from the beginning. Playlist1 will not be played.
- Double click a schedule and the Edit dialog box appears.
Figure 5-4 With overlapped timeslot
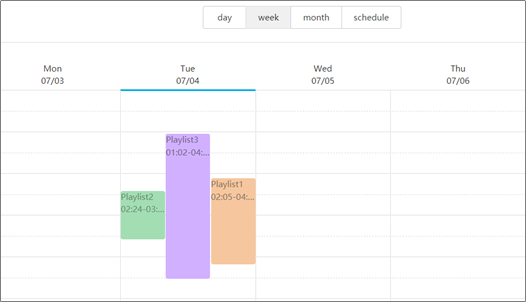
Drag the three schedules in Figure 5-4 until they don’t have overlapped timeslots. Then the schedules is displayed as the Figure 5-5.
Figure 5-5 Without overlapped timeslot