...
| Expand | ||
|---|---|---|
| ||
Before You Begin
Operating StepsStep 1 Connect the WiFi AP of the Taurus products. Step 2 Start ViPlex Handy. ViPlex Handy automatically detects the Taurus and refreshes the screen list. Users can also swipe down to manually refresh the screen list.
Step 3 3 Tap Tap Connect next the screen name. Step 4 4 Enter username and password, and tap Login. After successful login, Step 5 5 Tap a screen name to enter the Screen management page. Step 6 6 Select Remote Management > Player Binding.
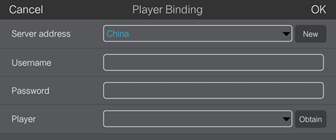
Step 7 Select a server. Enter the authentication user name and password of the player. The authentication information must be consistent with the authentication information in VNNOX. Step 8 Tap 8 Tap Obtain and select an asynchronous player from the drop-down options. Step 9 Tap 9 Tap OK. |
| Expand | ||
|---|---|---|
| ||
Before You Begin
Operating StepsStep 1 Connect the WiFi AP of the Taurus products. Step 2 Start ViPlex Express. Step 3 Click Refresh to refresh the screen list. After detecting the Taurus, ViPlex Express will try to log in to the Taurus with the default account or the account used for last login.
Step 4 Click Connect next the screen information. Step 5 Enter the password for the "admin" user and then click OK. After successful login, ViPlex Express saves the account information automatically. Step 7 Click Server configuration. Step 8 Select the target terminal in the terminal list. Step 10 Click |

