Application Scenarios
Media is the smallest unit of a solution. Uploading media is to upload the playback contents to the platform.
Related Information
The types of media supported by VNNOX AD are shown in Table 3-1.
Table 3-1 Media types
Media Type | VPlayer | Taurus |
|---|---|---|
Video | Video container formats: MP4, AVI, RMVB, FLV, MKV, WMV, MOV | Video container formats: MP4, AVI, FLV, WMV, MOV |
Audio | Currently not supported. | MP3 Note: Audio files can be used as the background audio of text and images only |
| Image | JPG, PNG, ICO, BMP, GIF, JPEG | |
| Document | Word, Excel, PPT, PDF | |
| Webpage | N/A | |
| RSS | N/A | |
| Page | Text, Image, digital clock, analog clock, environment monitoring, weather, calendar, webpage, RSS, window, colorful text | |
| Cut-to-Display Media | Text, Image | |
| Streaming Media |
| |
When a video cannot meet the decoding specifications of some asynchronous players, a corresponding prompt is displayed in the media list. Users can view the details to handle the problem.
Step 1 Choose  > Media Management > Media.
Step 2 Click Add and select a media type from the drop-down options.
- Upload File: Click Choose file to choose media from your local devices and click OK.
- Webpage: Name the webpage and enter its address. Click OK, and the webpage attribute editing page appears.
- RSS: Name the RSS and enter its address. Click OK and the attribute editing page of the RSS appears.
- Page: Enter a name for the page and click Next. Select a page template and click OK. Then the attribute editing page appears.
- Cut-to-Display Media: Enter a name for the cut-to-display media, specify the resolution, direction and the number of parts of the cut-to-display media, then click OK. The attribute editing page of the cut-to-display media is displayed.
Streaming Media: Enter the name and address of the streaming media. Click OK and the attribute editing page of the streaming media appears.
A page media contains one or more other types of media. When added to page, media’s attributes will conform to page attributes.
Step 1 Choose > Media Management > Media.
Step 2 In the media list, select a media item the type of which is Page,and click Page Edit, or click ![]() next to the name of a page media to enter the editing page, as shown in Figure 3-2. The editing page is illustrated in Table 3-2.
next to the name of a page media to enter the editing page, as shown in Figure 3-2. The editing page is illustrated in Table 3-2.
Figure 3-2 Editing page

Table 3-2 Description of the editing page
No. | Description | Details |
|---|---|---|
1 | Buttons for adding media. | Click a button to add the corresponding type of media. |
| 2 | Buttons for editing media. | Zoom pages in and out, delete media, and adjust media layer order and layout. Batch operations are allowed.
|
3 | Page editing area. Double-click on the whitespace to add text. | |
4 |
| |
5 | Buttons to save a page, save a page as a template, and preview a page. Audio files cannot be previewed. | |
Step 3 Add required media, edit properties and adjust layout.
Step 4 (Optional) Click Preview to view the playback effect.
Step 5 After the editing is done, click Save.
Step 6 (Optional) Click Save As Template to save the page as a template.
Scenarios
When the pixel width (height) of the resolution of a screen is greater than the pixel width height of the maximum loading capacity of a multimedia player, but the screen resolution does not exceed the maximum loading capacity of the multimedia player, cut-to-display media can be used to enable solution playback on ultra-long screens.
Constraints
When you create cut-to-display media, the resolution must be consistent with the configured screen width and height.
- When the cut-to-display media is played on an asynchronous terminal, the configured screen width and height cannot exceed the maximum width and height of the loading capacity of the Taurus series multimedia player.
- When the cut-to-display media is played on a synchronous terminal, the configured screen width and height cannot exceed the width and height of the computer screen resolution.
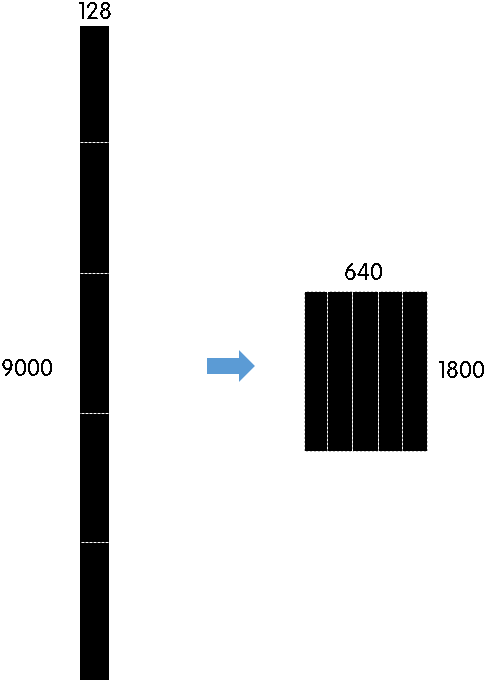
Examples
The resolution of a screen is 9000×128 or 128×9000 and the maximum loading capacity of a TB8 multimedia player is 2,300,000 pixels with a maximum width of 4096 pixels and a maximum height of 1920 pixels.
- Ultra-wide screen (9000×128)
-Number of parts: 9000/4096 = 2.20 (Here an integer is required, so the number of parts is 3.)
-Screen width to be configured: 9000/3 = 3000
-Screen height to be configured: 128 × 3 = 384

- Ultra-tall screen (128×9000)
-Number of parts: 9000/1920 = 4.69 (Here an integer is required, so the number of parts is 5.)
-Screen width to be configured: 128 × 5 = 640
-Screen height to be configured: 9000/5 = 1800
Operating Procedure
Step 1 Choose ![]() > Media Management > Media.
> Media Management > Media.
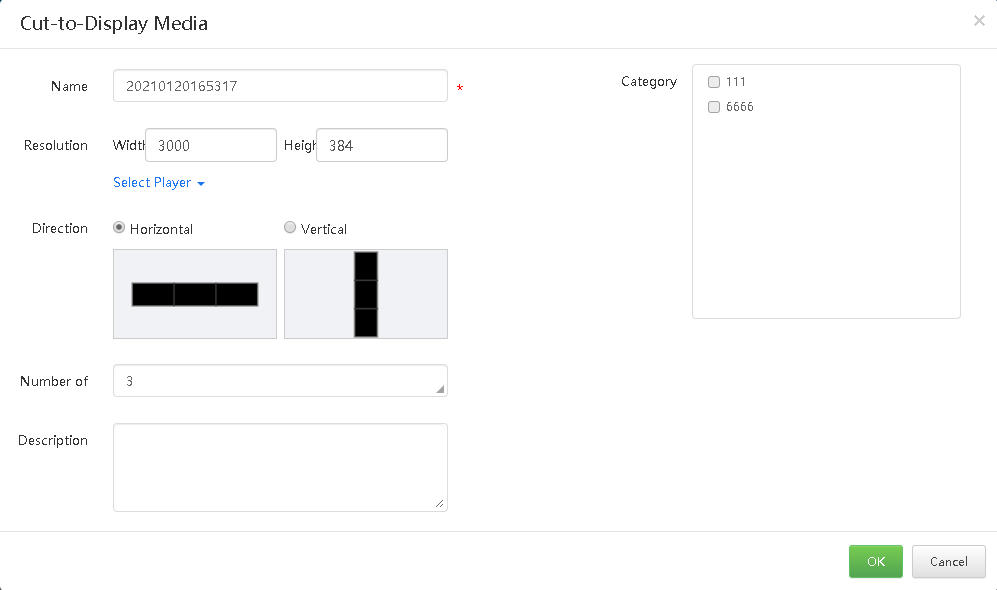
Step 2 Click Add and select Cut-to-Display Media from the drop-down options.
Step 3 In the Cut-to-Display Media window, specify a name, resolution and the number of parts, then click OK.
- The resolution of the solution must be consistent with the configured screen resolution.
For the detailed calculation method, see the preceding Examples.
- Set the Direction as required. For an ultra-wide screen, select Horizontal, while for an ultra-tall screen, select Vertical.
- The number of parts is calculated according to the actual screen width and height and the configured screen width and height.
For the detailed calculation method, see the preceding Examples.
Step 4 On the editing page of cut-to-display media, as shown in Figure 4-6, add the required media items, edit their properties, and adjust the layout.
The editing area of cut-to-display media is displayed based on the actual screen size.
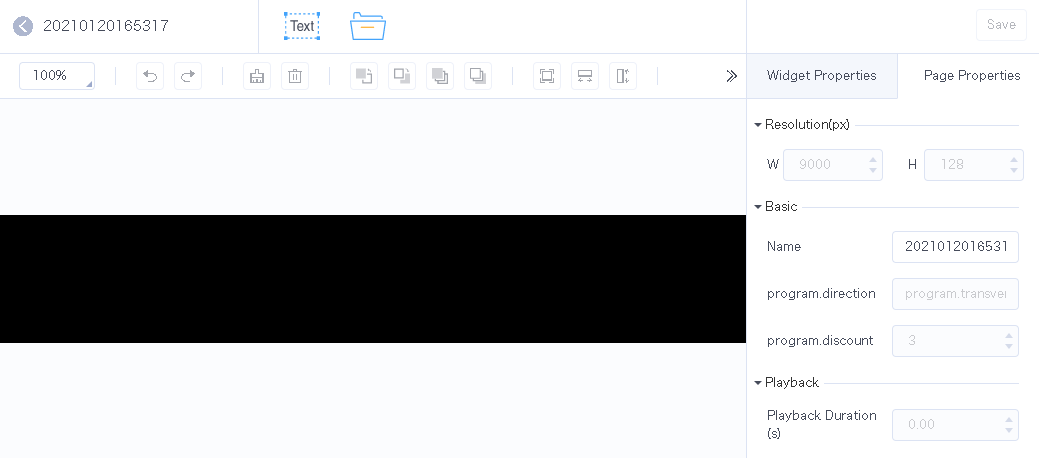
Step 5 After the editing, click Save.
Related Information
If a modified media item is added to a playlist and the playlist is added to a solution which is already associated with a player, there will be 3 cases according to the distribution type in the player attributes after the modified media item is saved:
- Manual distribution: Users perform following operations to distribute the new solution manually.
Choose > Players Management > Players. Select the target player and click Update solution.
- Auto distribution: VNNOX automatically distributes the new solution.
- Scheduled distribution: VNNOX distributes the new solution at the specified solution update time. If the update time has passed, the new solution will not be distributed.
Operating Procedure
Step 1 Choose > Media Management > Media.
Step 2 Select one media item and click Attribute, or select more media items and click Bulk edit.
Media attributes are explained in Table 3-3. Only some tabs and attributes are displayed during batch edit.
Figure 3-3 Media attributes

Table 3-3 Media Attributes
| Tab Name | Purpose | Description |
|---|---|---|
| Basic Info | Set the basic information of the media, such as the description, validity range, and categories. |
|
| Workgroup | Specify the workgroup the media belongs to and select the workgroups to which you share the media in a non-public workgroup. | The system administrator can view all the media. Sub-users can view the media only in the public workgroup, their workgroups and sub-workgroups, as well as the media shared to their workgroups. |
| Approval | Approve, request for approval, or refuse media. |
|
| Play Logs | Choose to show or hide the play logs. | After the play logs are hidden, the play logs of this media are not displayed in Player Management > Play Logs. |
| Preview | Preview the playback effect of images, videos, streaming media, or documents. | This tab is displayed when the media type is image, video, streaming media, or document. |
Step 3 After attributes are edited, click Save or Save&Close.