During the process of binding a VPlayer to VNNOX Standard/AD, a synchronous player is created automatically in VNNOX Standard. During the process of binding a Taurus to VNNOX Standard/AD, an asynchronous player is created automatically in VNNOX Standard.
In Players Management, you can perform the following operations:
- Update player status
Transfer players to VNNOX AD
- Rename players
Upgrade terminal players
Delete players
- Group players
See detailed introduction of transferring players, upgrading terminal players and grouping players in Player Transfer, Terminal Player Upgrade and Player Grouping.
Step 1 Open VPlayer, as shown in Figure 4-1.
Figure 4-1 The Config tab

Step 2 Select a server address. Player name defaults to terminal name and can be edited by users.
Step 3 Enter the server name and address and then click OK. The Server Address must be consistent with the address in VNNOX.
Step 4 Enter the authentication user name and password which must be consistent with those in VNNOX.
Step 5 Click Get and then click OK to close the prompt box. Bind and create player will be displayed in the drop-down options.
Step 6 Click OK.
After the player is bound successfully,  is displayed at the bottom left of the page.
Before You Begin
- Get the SSID and password of WiFi AP of the Taurus. The default SSID is “AP+the last 8 digits”. The default password is “12345678”.
- Get the password of the user “admin”. The default password of the user “admin” is “123456”.
- Connect the Taurus to Internet.
Operating Steps
Step 1 Connect to the WiFi AP of the Taurus products.
Step 2 Start ViPlex Handy.
ViPlex Handy automatically detects the Taurus and refreshes the screen list. Users can also swipe down to manually refresh the screen list.
 : Denotes that the Taurus is online and you can log in to it. Go to Step 3.
 : Denotes that Taurus is offline and you cannot log into it.
Step 3 Tap Connect next to the screen name.
Step 4 Enter the password for the "admin" user and then tap Login.
After successful login, ![]() is displayed. ViPlex Handy saves the account information automatically.
is displayed. ViPlex Handy saves the account information automatically.
Step 5 Tap a screen name to enter the Screen management page.
Step 6 Select Remote Management > Player Binding.

Step 7 Select a server. Enter the authentication user name and password of the player. The authentication information must be consistent with the authentication information in VNNOX.
Step 8 Tap Obtain and select Bind and create player from the drop-down box.
Step 9 Tap OK.
Before You Begin
- Get the SSID and password of WiFi AP of the Taurus. The default SSID is “AP+the last 8 digits”. The default password is “12345678”.
- Get the password of the user “admin”. The default password of the user “admin” is “123456”.
- Connect the Taurus to Internet.
Operating Steps
Step 1 Connect to the WiFi AP of the Taurus products.
Step 2 Start ViPlex Express.
Step 3 Click Refresh to refresh the screen list.
After detecting the Taurus, ViPlex Express will try to log in to the Taurus with the default account or the account used for last login.
 : Denotes that the Taurus is online and you can log in to it. Go to Step 4.
 : Denotes the Taurus is offline and you cannot log into it.
 : Denotes logging into the Taurus is successful.
Step 4 Click Connect on the right of the screen information.
Step 5 Enter the password for the "admin" user and then click OK.
After successful login, ViPlex Express saves the account information automatically.
Step 6 Select Screen Control.
Step 7 Click Server configuration.
Step 8 Select the target terminal in the terminal list.
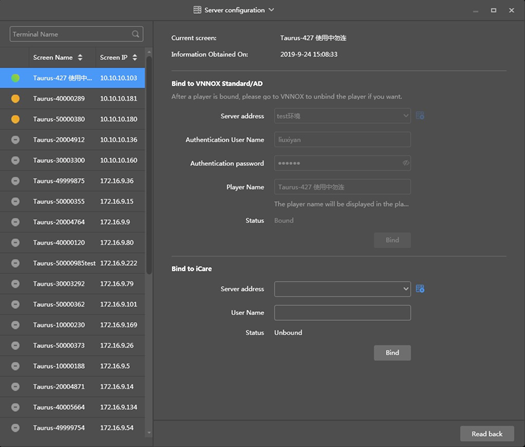
Step 9 Select a server. Player name defaults to terminal name and can be edited by users. Hold down the Shift button and select multiple terminals to bind terminals in batches.
Step 10 Enter the authentication user name and password of the player. The authentication information must be consistent with the authentication information in VNNOX.
Step 11 Click Bind.