Step 1 Choose  > Media Management > Solution.
Step 2 Click New.
Step 3 Enter a name for the solution and set its categories, and click Next.
Step 4 Select a frame template and click OK. The Solution Settings tab of the frame template attribute page and the week timetable will appear. An example of a solution with only one frameset is shown in Figure 5-2. Description of the page is shown in Table 5-4. If the solution has more framesets, it is required to schedule each of the framesets respectively.
Figure 5-3 The Solution Settings tab
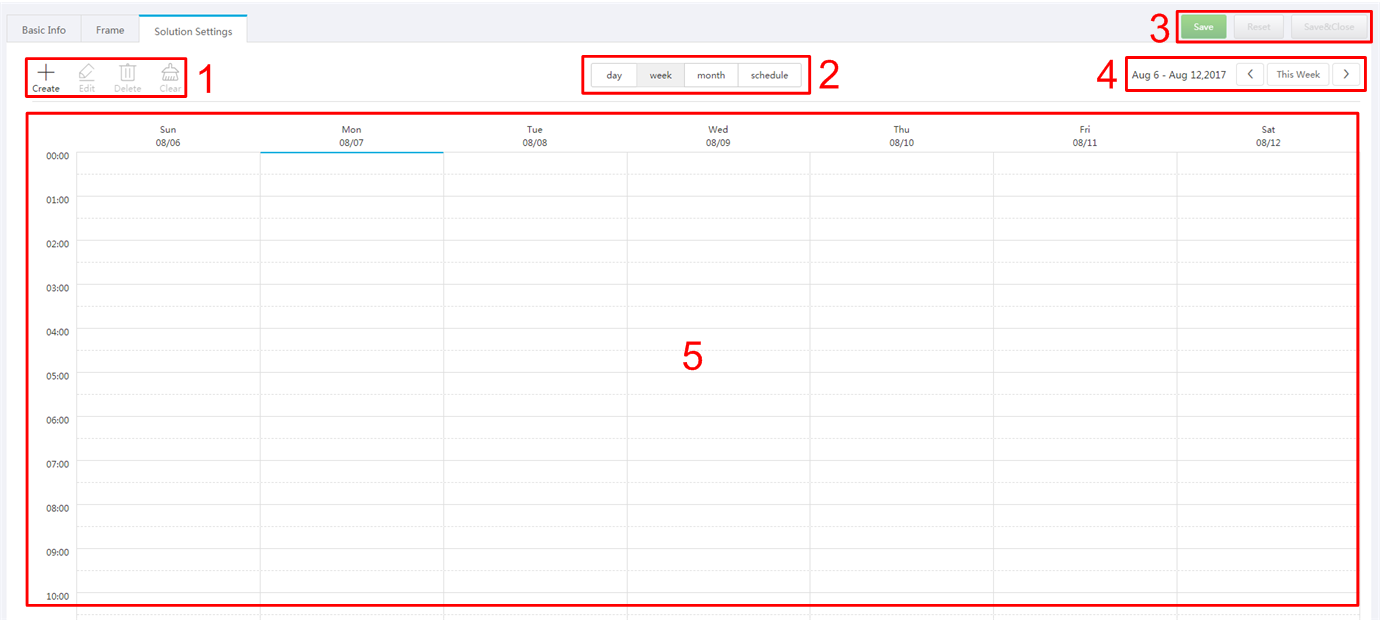
Table 5-4 Description of the Solution Settings tab
No. | Function | Description |
|---|---|---|
1 | Schedule buttons |
|
2 | Date buttons |
|
3 | Common buttons |
|
4 | Date switching buttons |
|
5 | Schedules | The default way to display timetable is by week. |
Step 5 Click day, week or month to enter relevant timetables. Perform any of the following operations to create the solution.
- Click Create.
- Click a cell in the timetable and click
 . Each cell of the timetable in day and week views stands for one hour, while in month view each cell stands for one day.
Step 6 Select a playlist in the Playlist tab of the Create dialog.
Step 7 Select the Play plan tab and set play duration and date or play duration and period.
- When the Repeat is set to Not repeating, the solution can be played normally according to the plan if the date is set to the current day or after 7 days. The solution will not be played if the date is set to other days.
- If the Repeat is set to Every day, Weekly, Per month or Per year, the solution will be played repeatedly according to the period you set.
Step 8 Select the Option tab and set the schedule color displayed in the timetable.
Step 9 After the configuration is completed, click OK. The schedule is graphically displayed in the timetable.
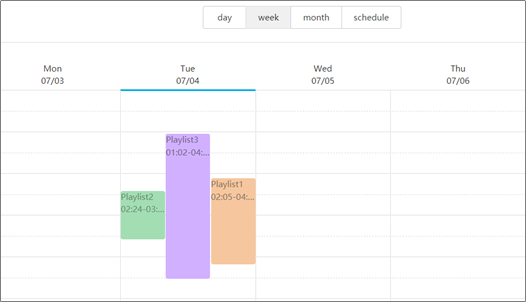
For the timetable in day and week views, the schedules will be displayed side by side in the timetable if the schedules have overlapped timeslot. In Figure 5-4, three schedules in the week timetable are taken as an example. VNNOX supports following operations on the schedules:
- Drag the top and bottom edges of a schedule to modify its timeslot.
- Drag a schedule to any position of the date when the schedule will be played to modify the timeslot.
- Drag the schedules to modify the playback priority order during the overlapped timeslot, for example, the priority order of the three playlists in Figure 5-4 is: Playlist3 > Playlist2 > Playlist3. After the playback of Playlist2 is over, Playlist3 will be played from the beginning. Playlist1 will not be played.
- Double click a schedule and the Edit dialog box appears.
Figure 5-4 With overlapped timeslot
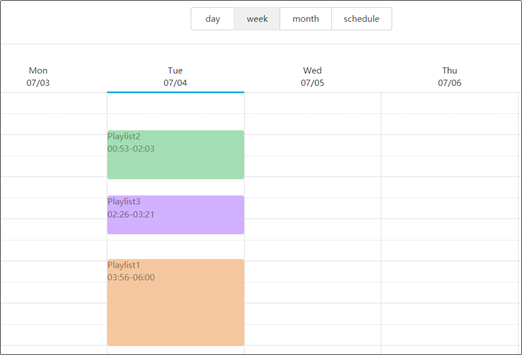
Drag the three schedules in Figure 5-4 until they don’t have overlapped timeslots. Then the schedules is displayed as the Figure 5-5.
Figure 5-5 Without overlapped timeslot
Step 1 Choose > Media Management > Solution.
Step 2 Click New.
Step 3 Enter a name for the solution and set its categories, and click Next.
Step 4 Select a frame template and click OK. The Solution Settings tab of the frame template attribute page and the week timetable will appear. An example of a solution with only one frameset is shown in Figure 5-2. Description of the page is shown in Table 5-4. If the solution has more framesets, it is required to schedule each of the framesets respectively.
Figure 5-3 The Solution Settings tab
Table 5-4 Description of the Solution Settings tab
No. | Function | Description |
|---|---|---|
1 | Schedule buttons |
|
2 | Date buttons |
|
3 | Common buttons |
|
4 | Date switching buttons |
|
5 | Schedules | The default way to display timetable is by week. |
Step 5 Click day, week or month to enter relevant timetables. Perform any of the following operations to create the solution.
- Click Create.
- Click a cell in the timetable and click . Each cell of the timetable in day and week views stands for one hour, while in month view each cell stands for one day.
Step 6 Select a playlist in the Playlist tab of the Create dialog.
Step 7 Select the Play plan tab and set play duration and date or play duration and period.
- When the Repeat is set to Not repeating, the solution can be played normally according to the plan if the date is set to the current day or after 7 days. The solution will not be played if the date is set to other days.
- If the Repeat is set to Every day, Weekly, Per month or Per year, the solution will be played repeatedly according to the period you set.
Step 8 Select the Option tab and set the schedule color displayed in the timetable.
Step 9 After the configuration is completed, click OK. The schedule is graphically displayed in the timetable.
For the timetable in day and week views, the schedules will be displayed side by side in the timetable if the schedules have overlapped timeslot. In Figure 5-4, three schedules in the week timetable are taken as an example. VNNOX supports following operations on the schedules:
- Drag the top and bottom edges of a schedule to modify its timeslot.
- Drag a schedule to any position of the date when the schedule will be played to modify the timeslot.
- Drag the schedules to modify the playback priority order during the overlapped timeslot, for example, the priority order of the three playlists in Figure 5-4 is: Playlist3 > Playlist2 > Playlist3. After the playback of Playlist2 is over, Playlist3 will be played from the beginning. Playlist1 will not be played.
- Double click a schedule and the Edit dialog box appears.
Figure 5-4 With overlapped timeslot
Drag the three schedules in Figure 5-4 until they don’t have overlapped timeslots. Then the schedules is displayed as the Figure 5-5.
Figure 5-5 Without overlapped timeslot